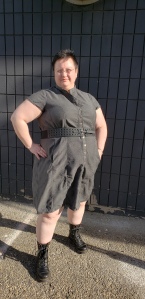
PATTERN REVIEW: CASHMERETTE HARRISON SHIRT-DRESS AND MINOR HACK (POCKETS!)
Also, I promise to post more one of these days, now that I have a sewing room again.

PATTERN REVIEW: CASHMERETTE HARRISON SHIRT-DRESS AND MINOR HACK (POCKETS!)
Also, I promise to post more one of these days, now that I have a sewing room again.

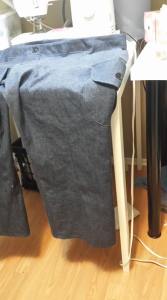
I have yet to get a good picture of myself wearing these, but I’ve made two pair of HotPatterns Weekender Utility Cargo Pants now, and really like them. I definitely plan to make more.
Things I like:
Things I liked less:
Things to watch out for in construction:
 Details:
Pattern Rating
Size Range (1-5) – 3 – from my perspective as a plus-size sewist, a 26 isn’t very big
Instructions (1-5) – 4.5 – clear and simple, but probably not suitable for the absolute beginner
Construction Process (1-5) – 5 – These went together exactly as expected and described.
Final Fit (1-5) – 5 – The princess seams helped me to get a really nice fit.
Overall Rating (1-5) – 4 – A good trouser, easily adaptable for many figure types, and quite fashionable right now.
I have a post up at the Curvy Sewing Collective for Pattern Hacking Month: Converting regular pants to tie-front wrap pants
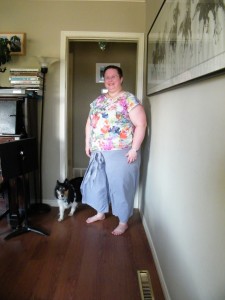
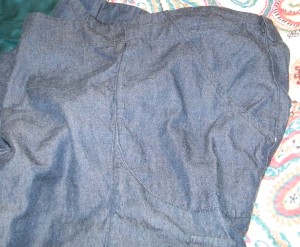
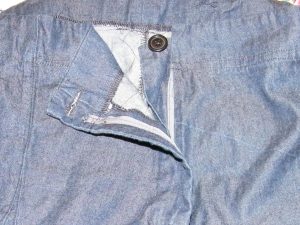
I made HotPatterns 1217 Utility Cargos, and they look good on the outside but not on the inside because I didn’t follow the directions. Another pair is cut out and ready to go – following the directions – before I write a review.
Went to an industrial music festival and made another HP Dressage Skirt
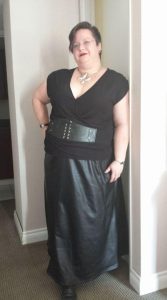
It’s Hotpatterns 1121 Riviera Cote D’Azur. It’s a little more involved than HP1189, and I can’t make one in two hours (yet?), but after making one, I liked it so much I cut out three more on a lay.
Rating:
Size Range (1-5) – 3. Looking at it specifically from the perspective of plus-size sewing, I would really like to see a higher size range.
Instructions (1-5) – 5. Super straightforward
Construction Process (1-5) – 5. Super straightforward
Final Fit (1-5) – 5. Once I adapted the pattern to my shape, it worked great. The center front and back seams, and the bust gathers, make it easy to adjust.
Overall Rating (1-5) + Explanation – 4. I would almost give this pattern a 5-star rating, but the issue with the neckband takes it down half a notch, as does the somewhat limited top end of the size range. Nonetheless, I highly recommend this pattern, as long as you cut the neckband longer than the pattern piece and test it before sewing it in for real.
I have a tradition that when I go on vacation, the night before I leave I start on an ill-advised last-minute project. This vacation, it was the Agility Tank swim top from 5 out of 4. I didn’t get it done in time for the trip, because it took a bit of practice to get the hang of the elastic edges and my rule for late-night sewing is, if you make a mistake that will require significant seam ripper use, go to bed and do it in the morning.
I finished it the day after getting back though, and I’m really happy with how it turned out.
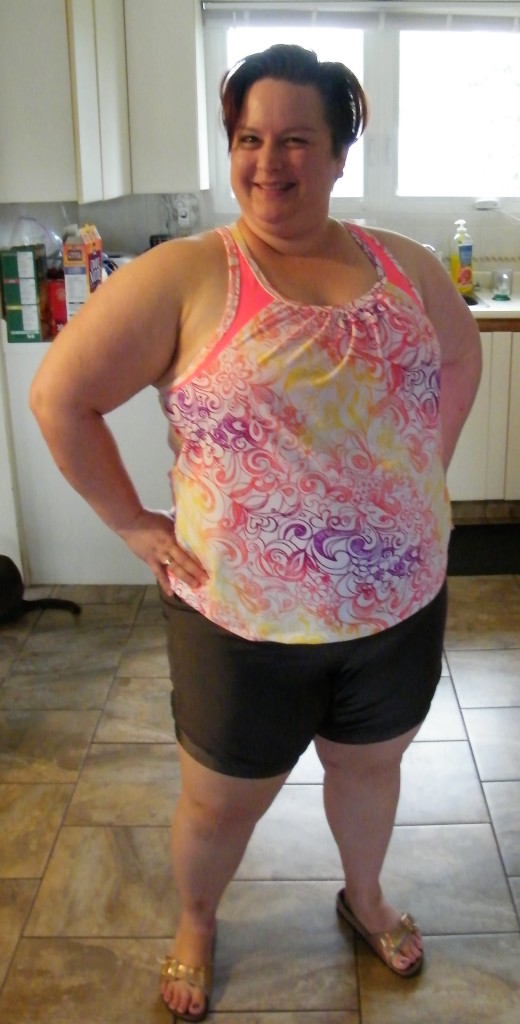
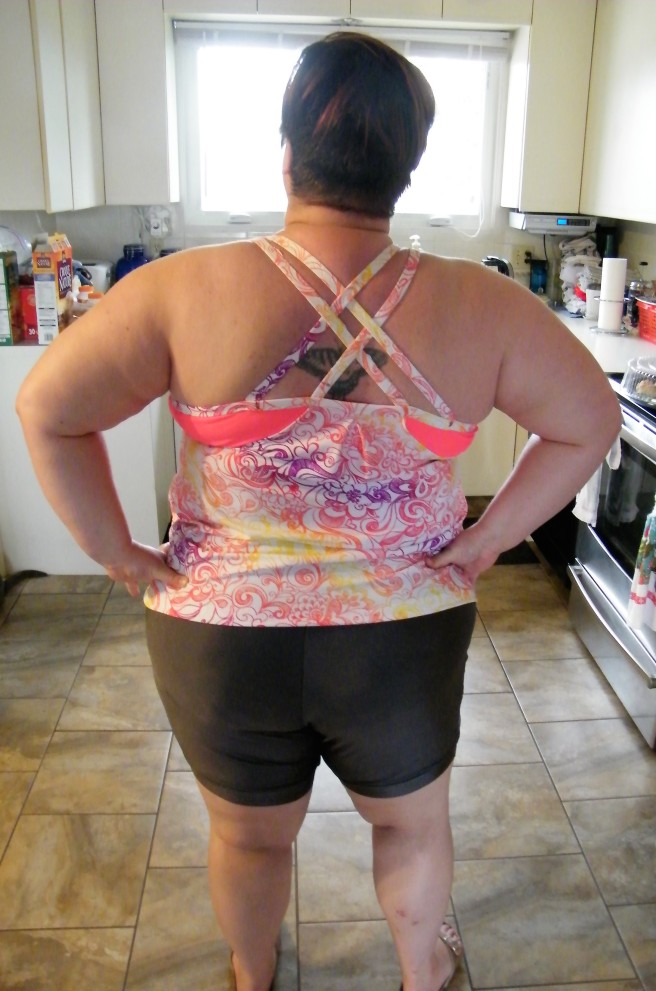
The top is a sports-bra (with options for T-back or strappy shoulders), with a gathered tank top overlay that hangs off it – options to cut the underarms so that they hang close to the body, or so they hang lower and show skin. There are maternity and nursing options as well.
It comes up to a size 3X which is for B50″/W46″. I didn’t make any alterations and 3X fit nicely on my B50″/W48″ self. The crossed straps, combined with a lycra swimsuit fabric with a fairly firm stretch and recovery, gives pretty good bust support. I like how it works with my figure, because it draws attention to the bust, and doesn’t suck into the belly and back-fat rolls. It’s modest, but not frumpy, and I like that too.
Construction was straightforward – this was my first venture into swimwear and elastic bindings, and while it took a bit of practice to get the hang of applying the elastic, understanding the instructions wasn’t a problem at all. It just takes a bit of dexterity to handle three layers of bra, the elastic, and the fabric that covers the elastic, and stretch only the layers that are supposed to be stretched while holding the other layers unstretched.
The only part I found particularly tricky was attaching the straps in the back – I would highly recommend an assistant to help you decide where to attach the straps and how long to make them. My husband is a great photographer, but not so good at pinning things, so I had to do it all by myself, and there was a lot of trying on, getting stabbed with the pins, twisting to see my back in the mirror, taking it off, repinning, getting stabbed with the pins, checking the mirror again, cussing, taking it off, getting stabbed with the pins, and cussing under my breath.
Something I particularly liked about this pattern was that it is a pdf with layers – you can click to choose which size(s) you want to print out, so instead of a tangled nest with all the sizes, you can print just what size you need.
I highly recommend this pattern for curvy sewists, as long as they aren’t super-busty – I’m not sure the sports-bra design would provide adequate support for larger than a D/DD Cup. I don’t have a lifestyle where I need a lot of swimsuits, so I don’t think I’ll make another one any time soon, but I might make just the strappy bra part, to wear under tops with low or wide necklines.
Size Range (1-5) – 3. 3X isn’t particularly large, and with the caveat I mentioned about cup size, there’s no reason it couldn’t come larger.
Instructions (1-5) – 5. Very easy to understand.
Construction Process (1-5) – 5. Straightforward.
Final Fit (1-5) – 5. Forgiving without being baggy, supportive, sporty and fun.
Overall Rating (1-5) – 4.5. This is a really excellent pattern, with lots of useful options, that looks great and should work for a variety of body types.
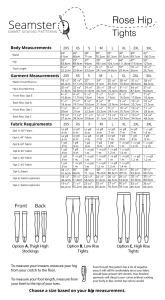 I am desperately in need of undershorts; I’m down to basically two pairs (three if I don’t mind rips and holes) – and I’m going on vacation next week to southern BC, where the forecast is 30C+ the whole week, and that means wearing dresses. Time to get sewing! My self-drafted undershorts pattern is too small now, and I don’t want to draft another, so my plan is to use Seamster Rose Hip Tights (The pattern company seems to have folded, but you can still buy this pattern from PatternReview, where it comes highly recommended.) to make shorts. It seems to me, if you can make thigh-highs by making only the legs and attaching the cuffs at the top of the legs, why couldn’t you make shorts by making only the bum, and attaching the cuffs to the bottom of the legs?
This looks like a fairly challenging pattern with interesting geometry and seams in places you wouldn’t quite expect – which is also why I like it. No inner thigh seam should mean less friction than standard undershorts. And if the shorts work out and I decide to make actual tights, the feet are cleverly constructed so there’s no seam on the underside – which is important to me because I have delicate princess feet and get blisters from just about everything.
Extra challenge: the largest size is for 42″W/50″H – and my measurements are 48″H/54″H. I had been thinking about doing math to try to figure out precisely how much I need to add, accounting for stretch percentages and so forth:
final garment measurement = my body measurement * ((finished garment measurement)/(pattern body measurement))
but for my first muslin I’m just going to wing it, adding 2.5″ at the waist tapering to nothing by mid-thigh.
I hope to post results of my first attempt, later this evening.
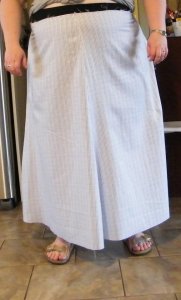
I have a review posted at the Curvy Sewing Collective today.
curvysewingcollective.com/pattern-review-hot-patterns-1208-fast-fabulous-dressage-a-line-skirt/

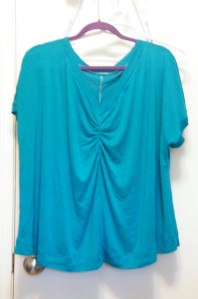
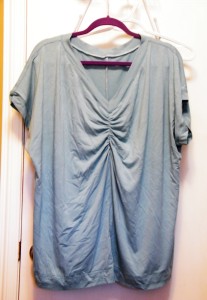
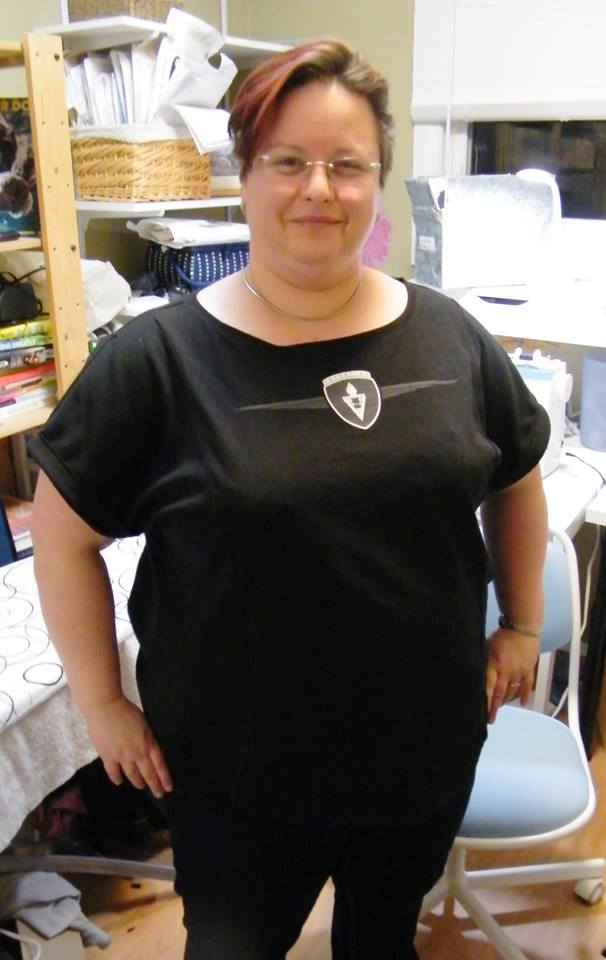
StyleArc’s Courtney is a great top that deserves love and attention. It dresses up, it dresses down, it lends itself easily to all sorts of colour blocking fun, and it works great for t-shirt upcycling. The design lines in the front mean it would be easy to tweak the fit for a larger bust (though it fit me right out of the envelope so I didn’t have to myself). The difficulty is rated medium, but I think it might be a bit easier than medium. I’ve made three of them now, all different, and I’m really pleased with all of them.
For the first one, I had a remnant of argyle print cotton knit, not quite enough to do anything with, but I had to buy it because I have this unholy obsession with argyle. By combining it with another remnant, I was able to get a whole top and make it look like I’d planned it that way.


Next, I decided it was time to do something about the shirt I bought to commemorate an awesome concert I’d been to (VNV Nation’s 20th anniversary tour). A standard men’s XXL t-shirt, and the fit was terrible:

I cut the center front pattern piece from the front of the t-shirt, and pieced the back from the back of the t-shirt plus some other fabric. I was able to squeak the neck and sleeve bindings out of the concert t-shirt, and then I used other fabric for the front side panels and the yoke.
Super happy with this one! Now I have a stylish shirt that I’m proud to wear!

And finally, the pattern is described as suitable for a knit or a woven, so for completeness sake I had to try a woven. This fabric – sections of ruffles and pintucks, joined by lace insertions – had been in my stash for about ten years, waiting for something suitable. I decided to bust it out and give it a try. Courtney works great in woven too!


Style Arc patterns come in sizes 4 – 30; a 30 is 58B/50W/61H.
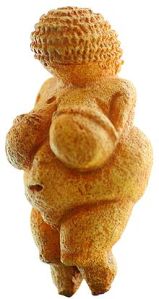 I’m 5’3″; I don’t know what fruit I am. I describe myself as looking like the Venus of Willendorf. My measurements are 50B/48W/53H. My high bust measurement is 46″.
In a nutshell: great!
I didn’t know what cup size StyleArc drafts for when I purchased the pattern (turns out it’s B), so at that time I bought the 22-24-26 grouping of pdf’s from their Etsy shop. I might have gotten an even better fit if I’d used a size 20 (B46.5″) and done a FBA, but I started with a size 22 (B49″) because that’s what I had on hand. From measuring the paper pattern, it looked like there would be plenty of ease in a size 22, without doing any adjustments. So, for maybe the first time in my adult life, I made this top right out of the envelope without any changes. And it worked!!!
The pattern is beautifully drafted, and everything lines up perfectly. A real pleasure to work with. I guess that’s the upside of the pattern coming with one size in one layout, rather than the sizes nested: there’s lots of space for lots of markings and no confusion about what notch or circle is for what size.
The instructions, though… very, very sparse. There’s a diagram showing how the pieces fit together, and a couple sentences about finishing, and that’s it. You need to already know roughly how a top goes together, or be really, really good at assembling Ikea furniture from their pictograph instructions. I’m both, so it was no problem for me, but a novice would definitely need help. It doesn’t say anywhere which pieces to interface, or where to topstitch, or anything like that; I just used my judgment.
One thing I did differently for the knit tops (but not the woven one) was, I did a double-layer yoke and attached the front and back using the burrito method, rather than doing a single layer. It gives a nicer, more professional finish. I would have done it with the woven, too, but I didn’t want to mess around with lining up the lacy bits across the layers.
Size Range (1-5) – 5
Instructions (1-5) – 3
Construction Process (1-5) – 5
Final Fit (1-5) – 5
Overall Rating (1-5) – 4
This is a really great top that I think would work on all sorts of different body types. The only reason I don’t give it the full five stars is the instructions, and the lack of nested sizes on the pattern sheet.
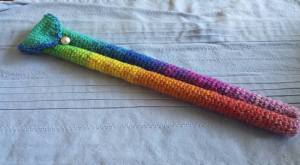
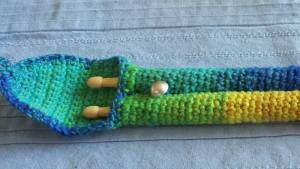
I’ve always wanted to play percussion. The desire gets stronger every time I do a performance with a symphony orchestra, or go to the symphony, or even just listen to classical music with a lot of percussion. I WANT TO HIT ALL THE THINGS!!!
So finally this summer I’m taking lessons. Because why not. Because maybe I’ll be able to get into a not-quite-total-beginner band in the fall. Because I so totally need another activity… not.
Since my sewjo is currently dormant, I decided that I needed a case for my new drumsticks. And crocheted one. Quite pleased with how it came out.
A couple weeks ago, I had a week off work, so I set myself the challenge of fit-testing five muslins in five days. I figured if I had some patterns already tested and ready to go, maybe I’d make something other than a T-shirt for a change. Proper reviews will come when (or if) there are FOs. For now, just a few comments.
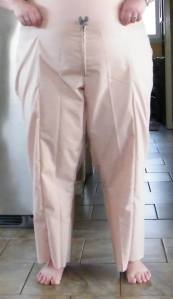
First up was this pair of trousers. It took me two days to get the fit right. HotPatterns’ crotch curve is fabulous for flatter, lower butts, but that’s the opposite of what I’ve got. And since I lost weight, my shape has changed, so the custom crotch curve I made for myself this time last year, didn’t really work when I drew it in for these pants.
On the other hand, once I created a crotch curve for my shape as it is now, these pants were quite easy to adjust because of the princess seams. I think this is going to replace my previous go-to trousers pattern after a tiny bit more tweaking.
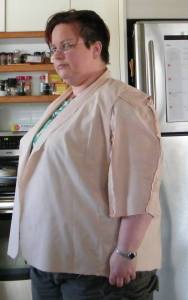
I started on this one when it was released last year, and had a terrible time with it. Because I couldn’t figure out how to do a FBA on this kind of darted princess seam, I tried to make it work in size 26 (as chosen by my full bust measurement) instead of two sizes smaller plus a 2″FBA, the armholes and shoulders were gigantic and it was just a mess. Then on top of that, the sleeves were extremely tight.
This year, I started with a size 20, based on my high bust measurement, then did a FBA. (I’ll post a tutorial on my cheater FBA… sometime – it’s OK the way I did it, but I think I can make it still better). And I added a seam along the outside of the arm to make room for my arms. It seems to have worked but I’m going to test it one more time before cutting into my nice, “real” fabric.
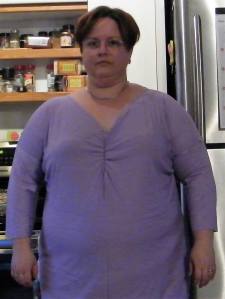 This is a more shapely and fun version of a knit T. I had trouble with the gathers at the bust – a 3/8″ seam allowance doesn’t really leave room for gathering stitches to hide after the real seam is sewn. Also, as is often the case, the sleeves were too narrow for my heavy upper arms. For the next iteration, I plan to add to the seam allowance at the gathers, and drop the sleeve opening (they’re cut-on cap sleeves, with a sewn-on extension to make them 3/4 length) by about 1″.
 As I’ve learned through experience, I started with a size 20, then added a 2″ FBA. The fit is mostly good, except, surprise surprise, too tight under the armpit. For my next iteration, I’m going to redraw the armhole to be a bit deeper and wider, and then also I feel like it’s a bit too A-line to be flattering on me, so I’m going to rotate the darts created by the FBA, to be more like French darts. And also shorten it six or eight inches.
I really like the shape and depth of the neckline, and the finishing method for the combined neck and armhole facing is slick and polished. Looking forward to doing one more test, then trying it for real.
 I’ve already completed one of these and worn it in public; I’ve submitted a review to Curvy Sewing Collective that I hope will be published soon.
It was super-easy to get a good fit – I just needed to add about 3″ to the front waist of a starting size 26. Also super fast and easy to whip up. I’m having trouble staying on track mentally with my capsule wardrobe plan, because the possibilities of this skirt demand execution in a huge variety of fabrics.
